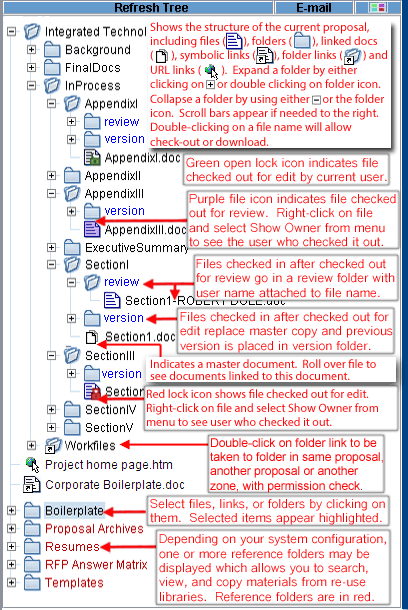
The tree view shows the structure and contents of the selected proposal and any reference folders. A "+" sign next to a folder indicates that it may be expanded to view contents.
Proposal sub-folders are only visible if the user has at least read permission to at least one file contained within. Users who are not admins may not be able to view version folders if it has been configured that way.
Click on the permissions icon in top right corner of tree view, or select show/hide permissions from the context menu, to see color coded permission settings. A window will open with color code key. When turned on, permission level is also shown in tool tip when mouse is rolled over node. Click on icon again to revert to normal tree view. If Show Permissions in Tree View is checked in the User Profile, permissions are displayed by default.
Reference folders contain read-only material that has been made available to users of all proposals by the administrator. Reference folders can be zone-specific, across all zones or both. Reference folders are shown in red. Third party users cannot view reference folders. Permission to view reference folders can also be removed from individual regular users on a zone basis.
Tree view navigational features are as follows:
- Roll over a file, when permissions are not being shown, and see the date the file was last modified, the size, the date it was last checked in, last user to check in the file, the current version, the document status and rating, if any.
- Roll over a master document and see the documents linked to it along with their total size and the regular information for the master document.
- Double-clicking on any document or symbolic link name or icon will open a panel with options to download, check-out for edit, and/or check-out for review the file depending on user's permissions. See below for more information.
- Double-click on a URL link to open a browser window to the linked web page.
- Right-click and select Refresh Tree or Refresh Folder to refresh the tree view after an update.
- Select folder, right-click and select Expand All to expand it and all subfolders except for version and review folders.
- Select folder, right-click and select Collapse All to collapse it.
- Right-click and select Sort Alpha/Date to toggle tree sorting method. Alpha is the default. Sorting by date will show files sorted by modification date with most recent at top of folder. Folders are always shown in alpha order.
- Right-click and select Sort by Type to switch to sort tree by file type. When sorting by type, secondary sort will be alpha. Folders are always shown in alpha order.
- Right-click on a file or link and select Send file by email to send the file, or a link to the file to another user.
- The tree view shows file check-out status. Files checked out for review are shown in purple. Files checked out for edit have a green lock icon (checked out by current user) or a red lock (checked out by another user). Right-click on file and select Show owner from menu to see who has the file checked out. It will show all users who have checked out the file, and whether it is for edit or review.
- Files in local tree views are displayed with Windows file type icons.
- Right-click on a folder/file and select Graphics Thumbnails from context menu to open a panel that displays thumbnails of all selected files with standard graphics extensions. Roll mouse over thumbnail to see file information including file name, path, file size and date last modified. The default view is the "Gallery" view. Select the "Details" view to see thumbnails displayed in table format with columns for file name, path, file size and date last modified. In either view double-click on a selection in the panel to open the file. From either view you can print selected image files, one image per page. Images will print real-size, or scaled-to-fit if larger than a page. When printing from the details view, user has the additional option of printing the table of thumbnails including the file metadata that is shown. In either view you can also select regular or large size (defined by the System Admin in the Maintenance Tool) for the thumbnails. You can choose your desired default size in your User Profile. You can also choose to generate thumbnails for graphics files located in subfolders. The default is determined by your preference in your User Profile. If you want to change it for the current viewing check or uncheck the box and click on the Regenerate button.
- If site is configured for dashboards, right-click on a file or folder and select Add to Favorites to add to the Favorites in the Dashboard view.
- Right-click on file and select Remove file to delete a document or link. User must have Delete permission for the file.
- Right-click on a file and select Check-out or Check-in to go directly to the appropriate panel on the VPC side with the file selected. Permissions will be checked to enable the menu items.
- Right-click on a file already checked out and select Undo Checked-out Document. Only enabled for System Admin or user who has the file checked out.
- Right-click on a file that you have checked out and select Update Document to allow other users to see the latest changes without losing ownership. Document will be checked out and immediately back in, transparent to the user. There will be no possibility to delete local copy, send document notification, change document status or update workplan.
- Right-click on file and select Add Comments to add a comment to the document history.
- Right-click on a folder and select Folder Activity Report to see the latest check-out, undo check-out and check-in dates along with the user who completed the latest action for all files in the folder for which the user has at least Read permission. The document status and the user who last changed it is also shown.
- Right-click on a folder and select Subscribe/Unsubscribe to subscribe to receive a broadcast message and an email any time a document is added to, moved into, or replaced in that folder. Subfolders are not automatically subscribed to so documents added or replaced in them do not cause an email and broadcast to be sent. It is possible to subscribe to version and review folders so a user can effectively see if any document has been checked into a particular folder. If user's access to a proposal is removed, or permissions to the subscribed to folder are set to No Access all related subscriptions will no longer be effective. User can also unsubscribe to a folder subscribed to by right-clicking on it and selecting Subscribe/Unsubscribe again.
- Right-click on a document that is checked out for edit and select Subscribe/Unsubscribe to subscribe to receive a broadcast message and an email when the document is updated or checked in. If the document is updated, then notification will be sent but the subscription will remain in effect. When the document is checked in, notification will be sent and the subscription will be removed. If further notification is desired for subsequent check-ins, user will have to subscribe again once the document is checked out again. If user's access to a proposal is removed, or permissions to the subscribed to document are set to No Access all related subscriptions will no longer be effective. User can also unsubscribe to a document with a current subscription by right-clicking on it and selecting Subscribe/Unsubscribe again.
- Right-click on folder and select Add File. User will be taken to Add panel. User must have Create permission in folder.
- Right-click on folder and select Add Folder. Panel will open requiring user to enter name for new folder. User must have Create permission in parent folder.
- Right-click on file or folder and select Rename. User must have Create permission in parent folder and Rename Files right in the proposal. A user with Create permission, but not Rename Files right, can still rename a file or folder before anything is done to them. This allows for fixing of mistakes when a new folder or file has been added. A folder can be renamed until a document is added to it, and a file can be renamed up until it has been checked out for the first time.
- Right-click on folder or URL link and select Add/Edit URL link. If on folder, panel will open requiring user to enter name and URL for new link. User must have Create permission in folder. If on existing URL link, panel will open allowing user to edit the name and URL. User must have Create permission and permission to rename files.
- Right-click on file in a Reference Folder and select Rate Document. Only documents in Reference Folders can be rated. Rating is from 1 to 5 with 5 being the highest. Each user can only rate document once. Average rating and number of entries will display in tooltip and in search results windows. Can also rate documents from document attributes search results panel.
- Can drag and drop files and links from any folder in which you have Delete permission to any folder in which you have Create or Delete permission. Related version and review files will be moved automatically. History and existing check-out state will be kept intact. Permissions set at the file and link level that are moved, will transfer along with the file. Otherwise permissions will be inherited from the new location. When the file is moved, you will be prompted to send document notification (if enabled for this proposal).
- Double-click on a folder link to be brought to the folder to which it is linked. Must have at least read permission for the folder link. If folder to which it is linked is in the same proposal, will be brought to that folder in the same tree view. If the folder to which it is linked is in another proposal, will be brought to the welcome panel as long as have access to both the zone and the proposal. Will be brought to the folder location in the Welcome panel tree view as long as you have at least read permission on that folder.
- Use Ctrl-C convention after selecting any folder/file in tree view to copy folder/file path to clipboard starting with zone name.
- Use the Shift key for continuous selection of folders/files. Use the Ctrl key for multiple individual selections of folders/files.
Double-clicking on a file, or its icon, in the tree view will open a panel with options to download, check-out for edit, and/or check-out for review the file depending on user's permissions. Read permission or higher is required for viewing files. Review or Edit permission, or higher is required for checking out documents. Regardless of permission setting, if check-out is disabled for a document neither check-out option will be given. Depending on setting of the preference in the User Profile, may be prompted to enter comments when selecting one of the check-out options. Keep in mind that viewing a document is not the same as checking it out. The local copy is saved as read-only in a temporary folder, and it cannot be checked back in. If the document needs to be changed for other users to see, Check-out must be used. When downloading a master document (document with links), the linked documents will be downloaded automatically. When checking out a master document, user is given option to download (not check out) the linked documents as well. If the user has no access to the linked documents they will not be downloaded.
Double-clicking on a symbolic link will open the file in the appropriate application. Double-clicking on a URL link will open a browser window to the linked web page. Symbolic links and URLs can’t be checked out. If file transfer compression is not turned off by the system admin, non-graphics files larger than 1 MB will be compressed and then decompressed automatically as they transfer to and from the server. Compression can be turned off and on for the current session from the main menu by selecting VPC/Advanced Options. The default compression setting for each session can be set in the User Profile. The file transfer can be cancelled by clicking on cancel button in progress icon.
|