It can be configured by the System Admin in the Zone Admin panel so that any admin and/or any Zone Super Admin (ZSA) can add new users and edit user data. Otherwise only the System Admin can do so. User data can be entered manually (VPC-managed) or configured to be pulled from a directory server (LDAP-managed).
Non-LDAP Configurations
In non-LDAP configurations, to add a user click New, enter required and desired data in applicable text boxes, and select or deselect check boxes for appropriate user settings. Values for the Role, Group, and Location, and Company fields can be selected from a pull down list to the right of each field, or entered as free text. When entered as free text, an "auto complete" function will try to complete the entry with matches from the pull down list, if any exist. The menus are populated with all previous unique values in that field. After all entries and settings have been made, click on Commit. Before a user is added, the system will check for properly formatted email addresses, and duplicate email addresses and warn, but allow. (Email addresses are treated as case insensitive.) It will check for full names with forbidden file system characters and duplicate full names and require to edit. Password will be checked to ensure it complies with requirements set in the Maintenance Tool and that both passwords match. Will be warned if entries exceed size limits and then have the option to edit. If no problems are found, will be given option to add user to current zone, to add user to current proposal groups and to send welcome message to user. An email containing the user's password is also sent.
To modify user data, click on user name, edit data and click Commit. Usernames cannot be edited. Only System Admin and ZSAs, if “Super admin can edit users” is checked for the zone, can modify a user's password and email address after the user has been created. ZSAs can only modify password and email for users with access to zone in which they are a ZSA and which are not ZSAs themselves.
VPC can be configured for automatic password generation. If enabled, admins will not be able to enter passwords manually. For new users, passwords will be generated automatically by VPC using the rules set up in the Maintenance Tool under Password Management. For existing users, regular admins, if admins can edit users in the zone, Zone Super Admins and the System Admin can check the Reset Password box to have a new password generated. When Commit is pressed the new password will be generated and a non-descript email with the new password will be sent to existing users automatically. For new users, the email with the password is only sent with the user welcome message. Regular admins and ZSAs can reset any passwords except for the System Admin’s and all ZSAs.
Users can be regular users or third party users. Third party users are limited in what they can do. These restrictions can be configured by the System Admin through the Maintenance Tool. The System Admin can also configure VPC so that new users by default will have the Third Party box checked. The box can be unchecked before committing to create a regular user. See below for more information on managing third party users.
LDAP Configurations
There are essentially two different methods for configuring VPC to use a directory server (also referred to as LDAP) for user authentication: 1. A group-based method that brings in only those directory server users into VPC that belong to a specified group; and, 2. A non-group based method that requires you to enter usernames into VPC first and then retrieve the information for those users from the directory server.
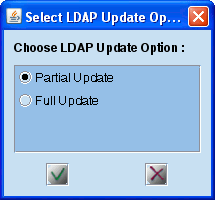
For the group-based LDAP configurations new users, except those with third party status, can only be added through LDAP. Third party users can be entered manually, or an LDAP user can be converted to third party. A batch update from the LDAP server will automatically be performed daily. Click on Update to force a refresh from the LDAP server. A choice of Partial or Full Update will be given. Selecting Partial Update will only retrieve information about new users in the directory server. Those already defined to VPC will not be updated. Selecting Full Update will cause all users in the specified group in the directory server to be updated. Full Update can incur a significant performance hit on the server for a very large number of users. For either type, all required fields must be tied to LDAP. All optional fields can be configured to LDAP fields or allow for manual entry. Where manual entry is permitted, the process is the same as it is for modifying regular users. Any admin can perform the update function as long as the configuration table entry 'AdminsCanUpateFromLDAP' is set to YES and Admins Can Edit Users is checked in the Zone Administration panel for the current zone. Zone Super Admins can perform the update function as long as Super Admins Can Edit Users is checked in the Zone Administration panel for the current zone.
For the non-group based LDAP configuration, when you click on the New button only the username field is editable. Enter a username and click on the Retrieve button located next to the username field. If the user exists in the directory server, the user's information will be retrieved and the appropriate fields will be populated. Non-required fields not mapped to LDAP fields can now be edited and can select or deselect check boxes for appropriate user settings. If the user does not exist in the directory server, you will be given the option to create it as a Third Party user, or cancel the operation.
With the non-group based LDAP configuration it is also possible to import a list of users defined in an Excel spreadsheet (through the method described below). In this case, the username should be filled in and the password field should be left blank. Other fields not mapped to LDAP fields may also be filled in. If the users are designated as Third Party users in LDAP, the "Is Third Party" column should be filled in with "Yes" and the "Expiration Date" column should be filled in with a valid expiration date. After obtaining the data from LDAP, VPC will update the fields that are present in the spreadsheet and that are not configured to be retrieved from LDAP. With this method there is no concept of full vs. partial update however, the daily batch update will be performed automatically.
With either method, an LDAP instance can be configured to have all users set to Third Party users. All users pulled from such an LDAP instance will have the Third Party checkbox selected, but disabled so it can't be changed. Another possibility with either method is to have users defined in special ldap-defined groups to be set to Third Party users. These users will also have the Third Party checkbox selected and disabled so it can't be changed.
User Settings
When creating a new user, or editing an existing user, it is possible to select a handful of settings which effect the rights of the user:
- Show Version - when checked allows the user to see version folders in the tree view in general. Right can be removed on a proposal basis in Permissions panel.
- Show Team - when checked allows the user to see the Team Members panel.
- Get Report - when checked allows the user to get Daily Reports if activated for proposal.
- Show Review Button - if unchecked, user cannot Check Out for Review unless Review permissions are specifically set for the document.
Sending Welcome Message
With all configurations, when a user is added manually, an email welcome message can be sent automatically to them if a standard message has been created by the System Admin. There are different welcome messages for regular and third party users. After clicking on commit, a panel will open with the standard welcome message and space to customize the message. Files can also be attached to the message. A Classification can be selected (if defined in the system). This is normally optional, but can be configured for mandatory selection. The sender of the message can either be the default or the currently logged in admin's email id. Click on OK to send or Cancel to abort. When a welcome email is sent, it will automatically include the username, and it will be followed by another email with the user’s password. If one is selected, the Classification will show up in the beginning of the email subject line. The welcome message can be resent at any time by selecting the user from the list (unless it is an expired third party user) and click on Send Welcome button.
Importing Users
With both LDAP and non-LDAP configurations, users can be imported from a properly formatted Excel spreadsheet. The column headers from left to right are as follows: Username, Full name, Email, Password, Phone, Cell Phone, Alternate, Role, Group, Location, Company, Show Version, Show Team, Get Report, Is Third Party, Expiration Date, Show Review, Trained On, Permission Group and Distribution Group. User data should be entered starting with row 2. Only the first 4 columns are required fields, though if automatic password generation is enabled the password field is ignored. After selecting the import file the admin will be offered the choice to add all new users to current zone. Will also be presented with welcome message panel with possibility to add additional message and attach files. Additional message and files will be sent to both third party and regular users along with the appropriate welcome message (regular or third party) for each user. A second email will be sent to each user containing their password.
- If required fields are missing, or if user has same fullname as another user in list or an existing user, an error message will be shown identifying problem users. Can continue with valid user entries or cancel.
- Show Version, Show Teams, Get Report, Is Third Party and Show Review correspond to check boxes in the users table. Enter Yes for check and No for unchecked. No entry means the default value is imported. The default value for Show Version, Show Team, Get Report and Show Review is Yes. The default value for Is Third Party is No.
- If Is Third Party is set to Yes, and third party user management is configured, the Expiration Date for the user will be set to the Expiration Date entered in the spreadsheet. If no date is entered, the entered date has already passed, or the date is more than the maximum allowable days from the current date, the Expiration Date for the user will be set to the current date plus the maximum allowable number of days.
- If a proposal is currently selected when importing user spreadsheet, and there is an entry in the Permission Group and/or Distribution Group column for a user, and the group(s) exists in the proposal, then user will be added to proposal group. If group does not exist, user will be added to VPC but an error message will indicate that user(s) could not be added to group(s) because group(s) does not exist. If proposal is not selected first, a warning will be shown and will be given chance to abort the import.
- When configured for group-based LDAP (see LDAP section above), only third party users can be imported in this manner.
- When configured for non-group based LDAP, it is possible to import both LDAP-managed and VPC-managed users through a spreadsheet (see LDAP section and importing users with non-group based LDAP section above). VPC will distinguish between LDAP-managed and VPC-managed users by the password field. If no password is entered for a user it will be assumed that the user is an LDAP-managed user and will look for them in the directory server. If a password is entered, VPC will assume the user is to be a VPC-managed user. Note: when Automatic Password Generation is enabled, a dummy password must be entered in the password field for VPC-managed users even though the contents of the password field is ignored so VPC can tell that a VPC-managed user is desired.
Third Party Users
If configured this way, all third party users will be disabled after a set period of time, unless action is taken to extend the period. The default maximum period is 90 calendar days, but this is configurable. When a third party user is created, or the status of a regular LDAP user is changed to third party, the initial expiration date will be set at the configured maximum. This can be changed before hitting the commit button by manually entering a new date or selecting from the date picker. If a date beyond the maximum is selected, an error message will appear after commit. The expiration date can be changed at anytime by selecting the user, editing the date (as long as the maximum is not exceeded), and committing. Third party users can be disabled immediately by selecting them, clearing the expiration date and then committing the change. For third party users that are disabled, the password and verify field will be disabled so their passwords cannot be reset. If automatic password generation is enabled, then the Reset Password check box will be disabled.
Disabled third party users can’t log on to VPC, although their settings will otherwise remain the same in case they are re-enabled. They will show in gray in admin User panel list, show on Group and Zone Admin user lists, but otherwise not be visible. If the user is part of a group, all actions performed for the group, such as permissions and access to proposals will be done as well for the disabled user in case it is re-enabled. When a third party user expiration date approaches, an email will be sent to the System Admin 3, 2 and 1 day prior to expiration.
General Information
When a user is selected from the list the Send Welcome button is activated, unless it's a third party user that has been disabled. Any admin can use this to resend the welcome message and password emails to the selected user. Passwords will only be sent to VPC-managed (non-LDAP) users. The sender of the message can either be the default or the currently logged in admin's email id.
To edit or create the regular or third party welcome message, click on the Edit Welcomes button and choose the desired type. The standard proposal welcome message can also be edited through the Edit Welcomes button. (See the editor panel.) For all three welcome types, a document can be specified that will automatically be attached to the welcome message when sent. A different document can be specified for each welcome type. The documents must already exist in VPC. Only the System Admin can access the button to Edit Welcomes. The proposal welcome message can also be edited or sent from any panel by going to the Administrator menu at the top, selecting Users, and then Edit Proposal Welcome or Send Proposal Welcome.
To grant zone access to a user, right-click on a user in the list and select Grant Access to Current Zone. When the user list has been filtered (see below), the context menu will enable the option to grant all users access to the zone, in addition to just a single user. Can also remove zone access to a user by right-clicking on user and selecting Remove Access to Current Zone.
To remove a user, click on user name then Remove. Need to confirm before user will be deleted. LDAP-managed users, when using the group-based method, can only be removed by removing them from the applicable group on the LDAP server.
System Admin can select a user and click on Remove From All Zones to remove zone access from all zones for the selected user. Will be given option to remove user from all proposal groups and/or all default groups the user is a member of. No change will be made to individual proposal access or permission settings.
Regular and third party users can also be managed by clicking on the Advanced User Management button and using the tool to manage multiple users at the same time. See Advanced User Management for more information.
VPC provides a controlled mechanism that allows designated regular users to request the addition of new team members to a proposal, as well as change roles for existing team members. Users can be granted this right in the Permissions panel on a proposal basis. The requests will be sent to a designated approver, or group of approvers, who are responsible for carrying out the requests or rejecting them. Approvers for each proposal can be designated in the Proposal Properties. Only admins, or groups with admin members, can be approvers. Approvers can view or act on requests by clicking on the Request Processing button. See more information at User Account Request Processing.
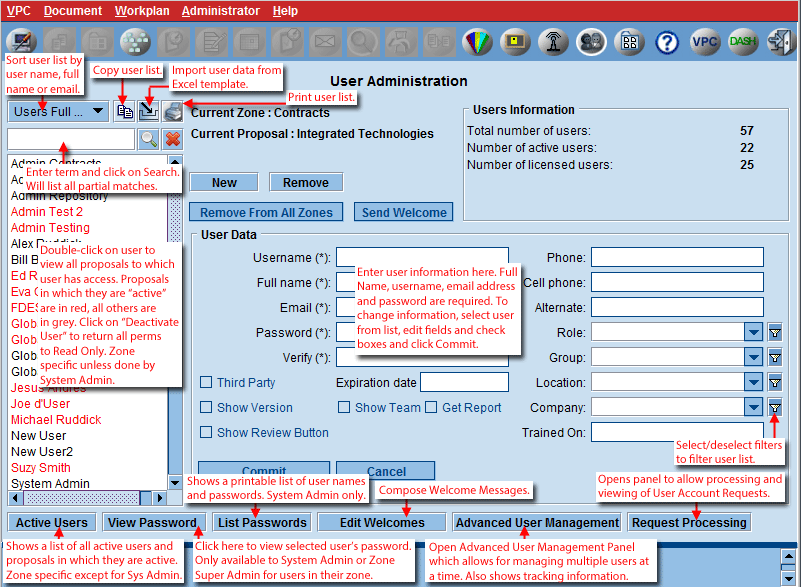
Users can be listed by full name, username or email. The user list can be filtered, or searched, to make it easier to find a user when dealing with a large number of users. Enter a search term in the text field and hit Enter or click on the search icon. The list will only display users that match, at least partially, the search term. To return to the full listing, click on the Cancel Search (red 'X') icon, or clear the field and hit Enter. For another navigational tool, when the users text box is selected and a letter key is hit, the list will scroll to the user name beginning with that letter. Can also filter user list by Role, Group, Location, Company, or any combination thereof. Select filter icon to the right of applicable text box, and select value from pull down menu. Repeat for multiple criteria. Click on filter icon again to de-select. Click on copy icon in user list to copy to another location, and click on print icon to print list. These functions can also be performed through the context menu by right-clicking on the user list and selecting the appropriate function.
Whether the user list is filtered or not, right-clicking on the list will bring up a context menu giving the options to copy the whole list, print the list and refresh the list of users. Right-clicking on a user will give the additional option of adding the user to a group, or groups. The user can be added to one or more groups, in one or more zones, with the current zone selected by default. If only the current zone is selected, by clicking on Show Proposals it is possible to select individual proposals in which the user should be added to the group. Additionally the user can also be added to the default group or groups.
Double-clicking on an active user (displayed in red) will show all the proposals that the user has access to regardless of zone, with the proposals in which the user is active displayed in red. The zone for each proposal is also displayed.
|