Help Contents | VPC Sign On | Welcome Page | Tree View | Open/Save Screen | Check-out | Check-in | History | Copy to Local | Add | Search (document) | Search (attributes) | Search (document attributes) | Entering and Editing Data in a Table | Workplan | Calendar | Pending Action Items/Tasks | Notification | Action Items | Email Table | User Broadcast | User File Merge | User Document Merge | Attributes (proposal) | Attributes (general) | Team Members | User Profile | Dashboard
Administrator Log On | Set Up | Copy to Local | Permissions | Groups | Admin. Workplan | Admin. Notification | Admin. Calendar | Admin. Action Items | Admin. Email Table | Admin.Search (document) | Admin. Search (attributes) | Admin. Search (document attributes) | Admin. History | File Merge | Document Merge | Admin. Attributes (proposal) | Admin. Attributes (general) | Admin. Attributes (document) | Banner Message | Broadcast Message | Users | Zone | Glossary (Definitions)

Proposal Creation and Editing

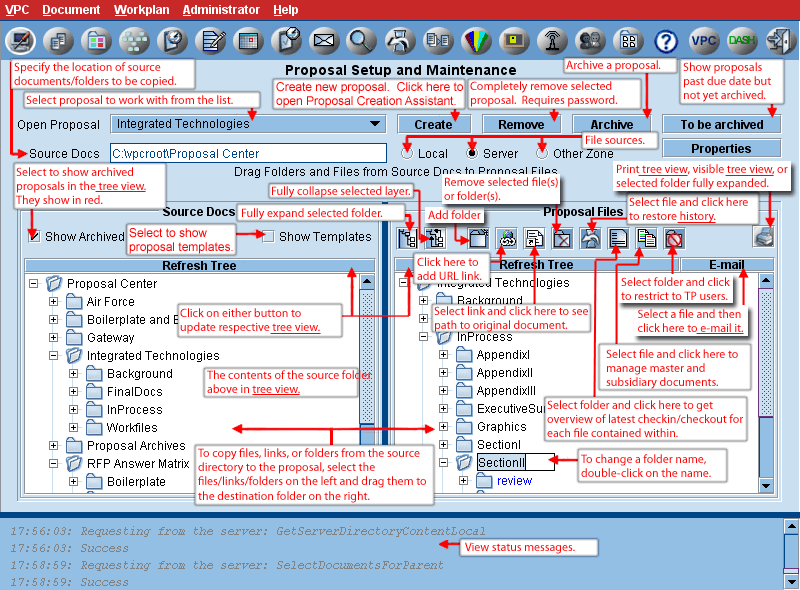
Provides for setup and maintenance of proposals. Allows folders and files to be added, removed, or copied from other proposals and other locations. All file formats and types, including URLs and symbolic links, are supported. The left tree view displays source documents. The default source location is the Server view which is the VPC server’s repository. It is zone-specific. Admins will only see proposals to which they have been granted access and for which their admin status has not been blocked. The Zone Super Admin will see all proposals in their zone. The System Admin will see all zones and proposals. Select the Local radio button for local drives or a network drive attached to the user’s system. Select Other Zone, and the zones to which the admin had access will show. The right tree view displays the contents of the specified proposal.

Key tree view navigational features are as follows:
  • Roll over a file and see the date the file was last modified, the size, the date it was last checked in, last user to check in the file, the current version and the document status.
  • Select folder and click on Expand Folder icon, or select Expand All from context menu to expand it and all subfolders except for version and review folders.
  • Right-click and select Sort Alpha/Date to toggle tree sorting method. Alpha is the default. Sorting by date will show files sorted by modification date with most recent at top of folder. Folders are always shown in alpha order.
  • Right-click and select Sort by Type to switch to sort tree by file type. When sorting by type, secondary sort will be alpha. Folders are always shown in alpha order.
  • Files in local tree view (left tree view with Local selected) are displayed with Windows file type icons.
  • Select folder and click on Collapse Folder icon or select Collapse All from context menu to collapse it.
  • Double-click on any document or symbolic link name or icon to download and launch the file in its native application.
  • Double-click on a URL link to open a browser window to the linked web page
  • Right-click on a file and select Check-out or Check-in to go directly to the appropriate panel on the VPC side with the file selected. Permissions will be checked to enable the menu items.
  • Right-click on a file already checked out and select Undo Checked-out Document. Only enabled for System Admin or user who has the file checked out.
  • Right-click on a folder and select Subscribe/Unsubscribe to subscribe to receive a broadcast message and an email any time a document is added to, moved into, or replaced in that folder. Subfolders are not automatically subscribed to so documents added or replaced in them do not cause an email and broadcast to be sent. It is possible to subscribe to version and review folders so a user can effectively see if any document has been checked into a particular folder. If user's access to a proposal is removed, or permissions to the subscribed to folder are set to No Access all related subscriptions will no longer be effective. User can also unsubscribe to a folder subscribed to by right-clicking on it and selecting Subscribe/Unsubscribe again.
  • Right-click on a document that is checked out for edit and select Subscribe/Unsubscribe to subscribe to receive a broadcast message and an email when the document is updated or checked in. If the document is updated, then notification will be sent but the subscription will remain in effect. When the document is checked in, notification will be sent and the subscription will be removed. If further notification is desired for subsequent check-ins, user will have to subscribe again once the document is checked out again. If user's access to a proposal is removed, or permissions to the subscribed to document are set to No Access all related subscriptions will no longer be effective. User can also unsubscribe to a document with a current subscription by right-clicking on it and selecting Subscribe/Unsubscribe again.
  • Right-click on a folder/file and select Graphics Thumbnails from context menu to open a panel that displays thumbnails of all selected files with standard graphics extensions. Roll mouse over thumbnail to see file information including file name, path, file size and date last modified. The default view is the "Gallery" view. Select the "Details" view to see thumbnails displayed in table format with columns for file name, path, file size and date last modified. In either view double-click on a selection in the panel to open the file. From either view you can print selected image files, one image per page. Images will print real-size, or scaled-to-fit if larger than a page. When printing from the details view, user has the additional option of printing the table of thumbnails including the file metadata that is shown. In either view you can also select regular or large size (defined by the System Admin in the Maintenance Tool) for the thumbnails. You can choose your desired default size in your User Profile. You can also choose to generate thumbnails for graphics files located in subfolders. The default is determined by your preference in your User Profile. If you want to change it for the current viewing check or uncheck the box and click on the Regenerate button.
  • If site is configured for dashboards, right-click on a file or folder and select Add to Favorites to add to the Favorites in the dashboard view.
  • Right-click on folder and select Folder Properties to open a panel with number of sub folders, files and total size of files.
  • Click on a folder link to be brought to the folder to which it is linked. If folder to which it is linked is in the same proposal, will be brought to that folder in the same tree view. If the folder to which it is linked is in another proposal in the same zone, will be brought to applicable Admin Setup tree view location as long as have admin status for that proposal. If not, and have access to the proposal, then will be brought to the folder location in the Welcome panel on the user side as long as you have at least read permission. If folder to which it is linked is in another zone, then VPC will check admin status, zone access and proposal access before bringing you to the linked folder in the setup tree view. Again if you don't have admin status in the proposal, but have access, will be brought to the folder location in the Welcome panel on the user side as long as you have at least read permission.
  • Archived proposals are not shown in left tree view or pull down menus unless the Show Archived box is checked. If this box is checked, archived proposals show in red in tree view and proposal selection menu.
  • Proposal templates are not shown in left tree view or pull down menus unless the Show Templates box is checked. If this box is checked, proposal templates show in blue in tree view and selection menu. Proposal templates can be edited after they have been converted to a template. (Only available to System Admin and Zone Super Admins)
  • The right tree view shows file check-out status as on user interface. Right-click on file and select show owner from menu to see who has the file checked out. It will show all users who have checked out the file, and whether it was for edit or review.
  • Use Ctrl–C convention after selecting any folder/file in right tree view to copy folder/file path to clipboard starting with zone name
  • Click on print icon to print right tree view. Have option to print selected folder as if fully expanded, all visible nodes in tree view, or entire tree fully expanded. Version and Review folders do not print
  • Use the Shift key for continuous selection of folders/files. Use the Ctrl key for multiple individual selections of folders/files.

Any admin can create a proposal. Click on Create and the Proposal Creation Assistant panel opens. (See Proposal Creation Assistant) Once created, only admins who have been granted access to a proposal can modify a proposal. To modify a proposal, select a proposal from the pull down menu and it will appear in the right hand tree view. Only those proposals, to which you have been granted proposal access, will appear in the pull down menu. PROPOSALS CANNOT BE MODIFIED IN THE LEFT TREE VIEW!

To delete a proposal, select proposal and Click Remove. You will be warned and then have to enter your password to continue. When a proposal is deleted, all related database entries are deleted as well including access and permission settings, document history, Workplan, attributes. Only admins who have been granted permission can delete proposals. Deleted files along with all proposal metadata will be moved to a special recycle bin on the server and may be recovered by the system admin through the Maintenance Tool.

VPC checks for duplicate folder/file/link names before allowing creation/copying of folders/files/links. Proposals can be renamed, but VPC will first give a warning. Proposal and folder/file names can't contain any of the following characters: \ /: *? < > " | or end with a "." They also can't contain more than one consecutive apostrophe or single quote (')

To copy folders, files, or links from another location to the proposal, first select the source from the available radio buttons. Then select the folder(s), file(s) or links from the tree on the left and drag to the desired destination folder on the right. This can also be accomplished using Ctrl–C and Ctrl–V combination, or by right-clicking on folder/file/link in left tree view and selecting Copy from and then selecting folder in right tree view, right-clicking and selecting Copy actions/Paste to. Links can only be copied from Server source. Selected folders/files/links must have the same parent node. Files and links can’t be copied to version or review folders. Also version and review folders are not copied when copying a folder. Individual version and review documents, however, may be copied with no problem. After dragging and dropping, a window will open giving you the option to enter any comments that will show in document history view. If multiple files/links are selected at same time, only one comment can be entered for all.

If document notifications are enabled for the proposal, when adding files the user will be prompted to send a document notification. This allows one to send a document notification broadcast message to desired recipients. An email can be sent as well. A panel will open giving capability to:

  • select the recipient
  • select a classification if one or more has been defined. This is optional unless configured for mandatory selection.
  • enter a message
  • select the hours till expiration
  • additionally send an email (default)
  • CC sender (default)
There will be a warning and request to edit if the message size exceeds the limit. (The default limit is 255 characters.) If adding multiple files at same time, only one notification is permitted for all. If a classification is specified, it will show in beginning of email subject and on first line of broadcast message. Emails sent will not be added to Email table. It is recommended to disable document notifications for the proposal during the proposal setup process and re-enable them, if desired, after proposal setup is complete.

Can copy email attachment(s) directly from any email program that supports drag and drop, such as Outlook, by dragging to target folder in right tree view. Will be prompted to add comment if desired. Can do the same from any program such as windows Explorer that supports drag and drop.

To create a new folder, first click on the parent folder to which it is to be added (in right tree), click on Create Folder icon, or right-click and select Add Folder, type in name and hit Return. To add a URL link, first click on the parent folder to which it is to be added (on right tree), click on Add URL link icon, or right-click and select Add URL link. In the panel that opens, type in name as you wish it to appear in tree view, and URL, and then Save to finish.

To add a symbolic link, select the Server radio button, select the desired file from left tree view, and while depressing the Ctrl and Shift keys, drag and drop to desired location in right tree view. Can also create a symbolic link by right-clicking on the desired file and selecting Copy from. In the right tree view, right-click on the destination folder and select Copy Actions/Paste as link.

To create a link to a folder, select the Server or Other Zone radio button, select the desired folder from left tree view, and while depressing the Ctrl and Shift keys, drag and drop to desired location in right tree view. Can also create a link to a folder by right-clicking on the desired folder and selecting Copy from. In the right tree view, right-click on the destination folder and select Copy Actions/Paste as link. Files cannot be copied to folder links. Multiple folders can be selected at same time to create multiple folder links at one time. Folder links can be renamed or moved. Selecting folder link and clicking Show Symbolic Link Source (or Show Source entry in context menu) will show the location of the source folder.

To change a folder/file/link name, click on its name in the right hand tree view, wait a second, then click again to open edit mode, or right-click and select edit, enter new name and hit Return. If changing a file name that has previous versions or review files, those files will be renamed as well. Version and review files cannot be manually renamed. To edit a URL link, click on its name in the right tree view, and select Edit URL link from the context menu.

To remove folder, file or link, click on it (in right tree only) and click on Remove icon, or right-click and select Remove Folder or Remove File. You will get a warning. Click OK to proceed. Deleted files are initially removed to a special recycle bin on the server and may be recovered by the system admin, but all history will be lost. Top-level proposal folders can't be removed this way. You will get an error message.

Folders, files and or links can be moved in the right hand tree view from one location in proposal to another by selecting and dragging and dropping to desired folder. Move can also be accomplished by using Ctrl–X and Ctrl–V combination, or by right-clicking on desired folder/file/link and selecting Copy actions/Move from and then right-clicking on destination folder and selecting Copy actions/Paste to. Related version and review folders/files will be moved automatically, and history and existing check-out state will be kept intact. Permissions set at the folder/file/link level that is moved will move along with it. Otherwise permissions will be inherited from the new location. After moving, you will be prompted to send document notification, the same as described above with adding files.

If file transfer compression is not turned off by the system admin, non-graphics files larger than 1 MB will be compressed and then decompressed automatically as they transfer to and from the server. You can turn compression off and on for the current session, from the main menu by selecting VPC/Advanced Options. You can cancel the file transfer and copy process by clicking on cancel button in progress icon.

If a file is deleted and replaced with a file with the same name, you can restore lost version history by selecting the file and clicking on the restore history button.

On the admin side only a document can be replaced without having to go through the check-out/check-in process. When dragging and dropping a file onto the right tree view, if a file with the same name already exists the admin will be prompted to replace the file or cancel. If replacement is selected, a copy of the original will be placed in the version folder and the new file will be given the next version number. The document history will be updated to reflect this. If the original document is currently checked out by the same user, they will be asked if they wish to check in the document instead of replace it. If not, the replace operation will be canceled. If the document is checked out by another user, the replace operation will not be permitted until the document is checked back in or the check-out is undone.

Select a folder and click on Folder Activity Report icon to see the latest check-out, undo check-out and check-in dates along with the user who completed the latest action for all files in the folder. The document status and the user who last changed it is also shown.

Access to specific folders can be denied to Third Party users. Regardless of permission settings, third party users will not be able to access any documents in the folder. Select a folder and click on No Access to TP icon. Can also be accomplished through context menu (right-click). Confirm to deny access. Repeat action on a restricted folder to now allow access to Third Party users.

Ordinarily when a file that has embedded links to other files is downloaded or checked out from VPC, those links are broken because the linked files are not also downloaded. When a master-subsidiary relationship is established, and a master document is downloaded or copied to local, the subsidiary or linked files are also downloaded. If a master file is checked out, the user has the option to have linked files downloaded along with it. If the user has no access to the subsidiary documents they will not be downloaded. Select a file from tree view and click on Manage Subsidiary Documents for Selected Master. A panel opens that allows you to specify subsidiary documents that will be linked to the selected master document. Select file from panel in tree view and click on Add to add subsidiary and Remove to remove.

Click on Properties button to view the Proposal properties. Many of the properties are editable.


Follow links for further information:

Proposal Archiving

Back to top

Proposal Creation Assistant

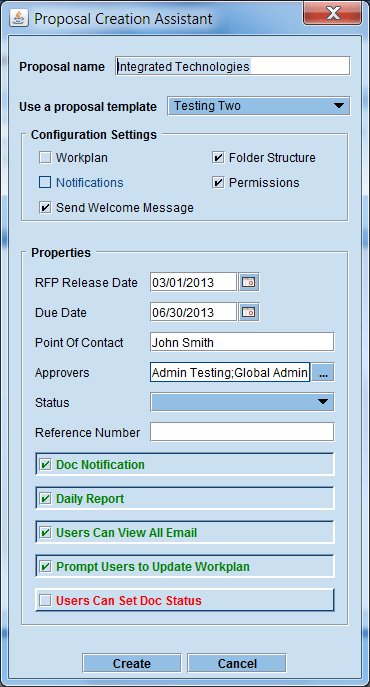
The contents of the Proposal Creation Assistant panel depends on whether at least one proposal template has been set up for that zone. The common elements to be entered or selected are:

  • Proposal name – Must be entered in text box subject to the following constraints:
    • Default maximum length is 32 characters, but is configurable.
    • Names must be unique, but the same proposal name can be used in different zones.
    • Names can’t contain any of the following characters: \ /: *? < > “ | or end with a “.”
  • RFP Release Date – Enter manually or select from date picker.
  • Due Date – Enter manually or select from date picker.
  • Point of Contact - enter manually.
  • Approvers - selected from a pull down list of all admins, or proposal groups with admins as members, that have proposal access. Selected users are able to process user account requests for the proposal that have been sent to the server for approval.
  • Status - selected from a pull down list that is populated from a list defined in the Maintenance Tool.
  • Reference Number - simple text field, can be filled with customer-defined value.
  • Doc notification – Enable (green - default)/disable (red) doc notifications for this proposal.
  • Daily report – Enable (green - default)/disable (red) daily report for this proposal.
  • Users Can View All Email - Allow users to view all email (green - default), or only emails sent to, or by, themselves (red) for this proposal.
  • Prompt Users to Update Workplan - On check-out or check-in, prompt users to update workplan (green - default), or not (red).
  • Users Can Set Doc Status - Allow users to set document status on check-in (green), or not (red - default).
If at least one proposal template has been created for, or associated with, the current zone you will have an option to have many elements of the new proposal created from a template. Select the desired template from the pull down menu. Check the desired elements to be copied to the new proposal which include the following:
  • Folder structure – Includes file templates and master-subsidiary relationships, if any. Selected by default if template is selected.
  • Permissions - Group and user permissions and all rights settings such as Display to Team, Edit Action Items and Rename Files. Groups will be created as necessary. Proposal Access will be automatically assigned to all groups and users that have ANY permissions (including No Access) explicitly set in the template. Note: When viewing the permissions panel for the template itself, the Grant Proposal Access checkbox is disabled. Access to a newly created proposal is granted based solely on the existence of explicit permission settings for a user or group. Folder structure must be selected for this check box to be selected. Selected by default if template is selected.
  • Workplan - Dates will be automatically shifted so that the first available date corresponds to current date. Actual Start and Completion dates will not be copied.
  • Notifications - If any notification on the template is marked as sent, it will be copied without the sent status and the date it was sent. Workplan must be selected for this check box to be selected.
  • Send Proposal Welcome Message – If a welcome message has been pre-configured by the System Admin, check this box to have it sent to all with proposal access. A panel will open with standard message. Can add to it. All users with proposal access are shown in the panel and unless deselected will be sent the welcome email.
  • Proposal Merge Templates, Approvers and Periodic Events will automatically be copied as well if a template is selected.
  • If the proposal template was created in another zone and associated with the current zone, users will not automatically be granted access to this zone. They may have to be granted access manually.
  • Proposal Templates can be modified after a proposal is converted to a template. You must select the Show Templates box on the Setup Panel to be able to access the proposal templates. The changes will effect any newly created proposals based on that template.
    • In the permissions panel for a template, the Grant Proposal Access checkbox is disabled. Access to a newly created proposal is granted based solely on the existence of explicit permission settings for a user or group.
    • If permissions are explicitly set in the template for a user who previously did not have any permissions set (new or existing user in the zone), they will be granted access, along with assigned permissions, in any newly created proposals based on that template.
    • If a new user is added to an existing proposal group in the template, and that group has any permissions set, that user will be granted access to any newly created proposal based on that template along with the appropriate permissions.
    • If a new group is added to the proposal template, that group will be created in any newly created proposal based on the template. If any permissions are set for the group in the template, the group will be granted access to the newly created proposal with the appropriate permissions.
    • Proposal Templates will have a reduced Proposal Properties panel showing the proposal creator, the creation date and the approvers selector. Approvers that are not given access to the proposal, or do not have admin status, during the proposal creation process will not be given approver status for the proposal.
After all elements have been selected, click on Create to proceed or Cancel to abort. Proposal creation from templates will proceed asynchronously on the server side, which means that the server will not be blocked, but the user will have to wait until the proposal is created to proceed. Admins who create a proposal are automatically granted access to it. System Admin will be given proposal access, and depending on the GiveSystemAdminCreate value in configuration table, create permission to System Admin will be set on proposal root folder. The proposal name appears in left and right tree views.

Proposal Creation Assistant screenshot

Back to top

Proposal Archiving

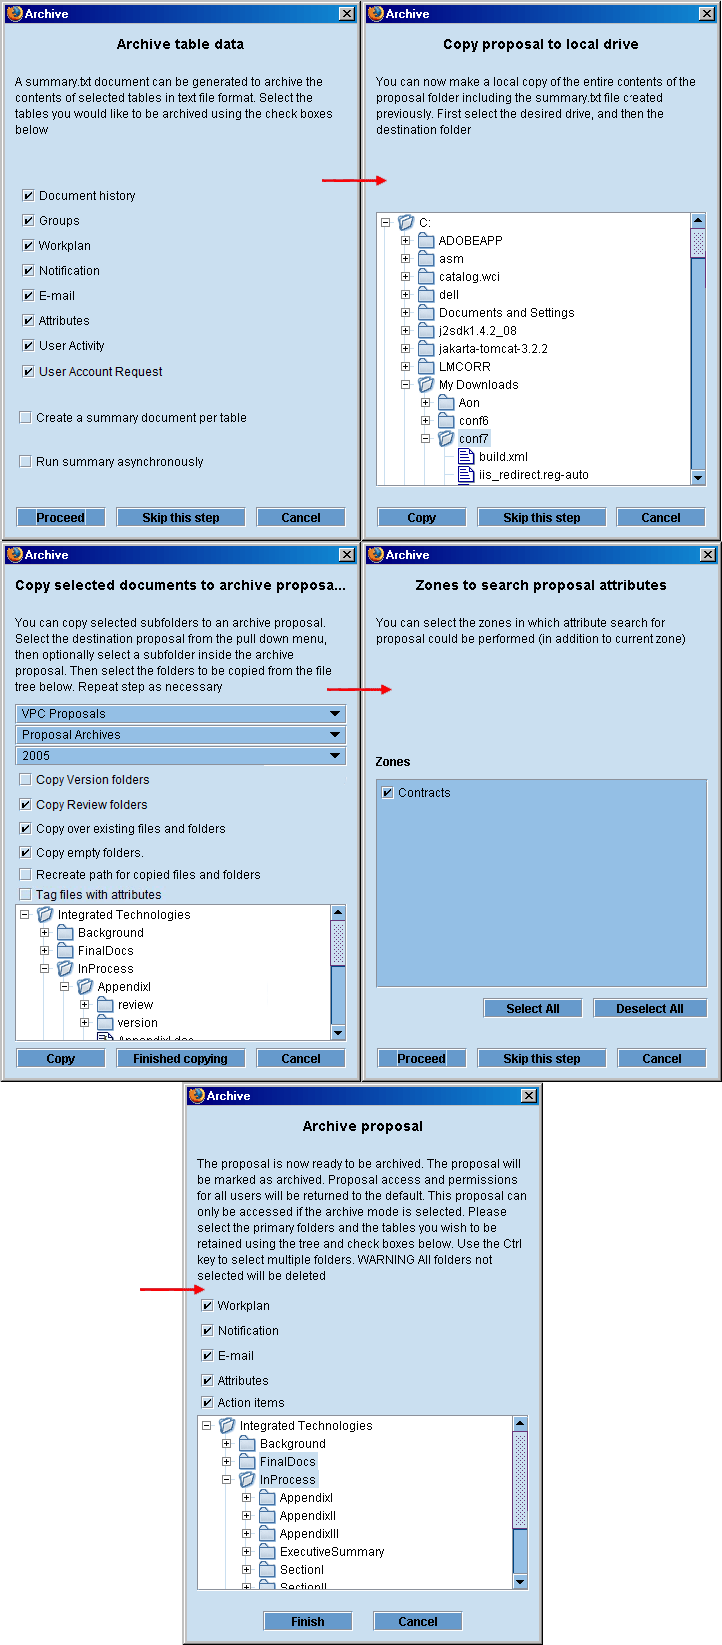
Archived proposals are not normally visible on any menu or file tree. To view, select the Show Archived button. Attribute search will show archived proposals with an indication of status. The archiving process involves 5 steps:

  1. Option to generate a text file with data from selected Document History, Groups, Workplan, Notification, Email, Attributes, User Activity and User Account Request tables. Also report summary of documents worked on by user with time subtotals. Can generate one report with selected info or a separate report for each (the default). Option to generate reports asynchronously so as not to block server if report generation would be time consuming. Option to view summary text file before continuing process if only one file is created.
  2. Option to copy the entire proposal folder to a local drive.
  3. Option to copy selected subfolders to an archive proposal or proposals in any zone to which have access. In this way selected proposal information can be made available to all users for reference purposes. Can copy multiple folders at same time. Will copy just selected folder or path to folder if that option is selected. Can select whether or not to copy version folders, copy review folders, copy empty folders, or copy over existing files and folders. File copy is verified. Can also select to tag all copied files with document attributes. When box is checked all copied files will be tagged with current proposal's attributes. Given option to tag files with additional document attributes, if any defined. Selectors allow choosing values for defined attributes. Can add duplicate values for any attribute. See Admin. Attributes (Document) and Admin. Search (Document Attributes) for more information.
  4. Option to make the proposal available for attribute search in other zones. Is automatically available for search in zone in which the proposal is located. If AttributesSearchAcrossAllZones is set to Yes in Maintenance Tool, this step will be skipped as all proposals in all zones will be available for attribute search.
  5. Option to retain Workplan, Notifications, Action Items, Email, Attributes and User Account Requests tables and selected file folders in proposal shell. Can select multiple folders. Can only select folders at the top level to be retained, but all subfolders contained within will be retained as well.

After all options have been selected, the proposal will be archived. All files in folders not selected to be retained will be deleted and proposal access will be returned to default. Deleted files are initially removed to a special recycle bin on the server and may be recovered by the system admin, but all history will be lost.

Archiving is limited to Zone Super Admin and System Admin, however regular admins have access to the first three steps.


Archiving

Back to top

© 1997-2015 Intravation, Inc.